
I thought this was a GREAT article and decided to post it in it's entirety here. I find in my holistic practice that people really want to eat well, but time and money are always limiting factors. This well written article helps overcome some of those obstacles.
How to Cook Whole Food From Scratch -- and Keep Your Day Job!
By Colleen Huber
Whole fresh foods should be the basis of what we all eat, whether your metabolic type is
protein type, carb type or mixed type. Whole foods, whether meat, vegetable or fruit, do
two things: they provide all the nutrients that nature put into the food--not just as a sum
of nutrients, but even more, as a synergy of nutrients that work together because they
naturally interact within the living plant or animal. When we eat these foods, which have
been connected with our whole existence as a species, the total health benefit to us is
much greater than the sum of the parts. The second practical advantage of eating whole
fresh foods is that they substitute, by their sheer bulk, the chemicals and denatured food
derivatives that we might otherwise eat.
But you work non-stop and when you get home there is no time or energy to do anything but nuke half-synthetic processed food in the microwave. How do we get into that trap?
According to Dr. Kenneth Proefrock, NMD, a huge part of the problem is not knowing what you’re going to eat on Thursday night until ... Thursday night. By that time, you’re lucky if you even make it home for dinner because your tummy rang the dinner bell back around Exit 128, and there just happen to be about four fast food outlets off that exit, as well as at the next exit coming up. (Funny how those fast food places are right there when the stomach growls.)
Here’s a big key, says Dr. Proefrock, to getting out of that trap. Plan on the weekend what you will eat for every meal the coming week. Your menu does not have to be set in stone; you can leave room to juggle for spontaneity now and then, but at least provide for enough of your own homemade food to eat each time you get hungry.
So how do you make your own homemade whole food and keep your day job too?
Here are several steps you can take to streamline your efforts and maximize the productivity of your kitchen, while keeping your time spent there to a minimum.
1. Clear enough freezer space--about one cubic foot--to store several pint and quart- size containers of the food you will cook. Then on the weekend, plan all of your meals for the week, and go to the supermarket once to purchase the whole food ingredients in one trip. Consolidating all grocery shopping into one trip already saves time over shopping for a few items everyday. Plus, with whole foods, you only need to go around the periphery of the supermarket where they are located, rather than taking time to go up and down the interior aisles where the processed foods are.
Once you’ve brought home all the groceries, cook all your meals for the week at the same time. This way, instead of standing at the stovetop each day for each meal, you are there for one longer session during that week, and then you’re done!
2. The trick is to cook big portions, but freeze in the smaller quantities that you and your family will eat throughout the week. If you cook for a family, a large recipe will probably be good for two dinners (on alternate days) during the week, as well as a lunch or two. If you live alone, you will get at least four meal portions with half of them saved for the following week. At this point you don’t have to spend any more time throughout the week than you would on TV dinners.
3. A food processor will work well for foods that you want to chop finely. Make freezer bags full of pre-cut vegetables that you can then defrost as needed during the week. One bag might contain pressed garlic with coarsely chopped string beans, which a few days from now you can sauté in coconut oil for a few minutes.
Another bag might contain chopped carrots, onions and tomatoes, along with cabbage that you cut into quarters. Sprinkle some caraway seeds into the bag. When you’re ready to make a meal of it, you can cook it a portion of it in a cup of chicken broth for a delicious meal of balanced nutrients.
4. Make use of large cooking vessels in order to accomplish the weekend cooking fiesta. A large crockpot really lends itself well to a whole foods diet. Here you don’t need a food processor. Chop vegetables very coarsely, in much larger chunks than you can get away with in a stovetop meal. This step alone saves a lot of time. Put an organic beef round or two turkey legs or a whole organic chicken on top of the vegetables, add a few cups of water, and/or tomato sauce, perhaps with balsamic vinegar. Sesame oil and tamari may be used instead for marinade. Add whole leaf herbs as you like, and you’re done. After practicing once or twice, you will have a huge crockpot meal thrown together in five to 10 minutes. Set it on "low" in the morning, and you’re done till dinnertime. In cool weather, you could do the same in the regular oven, with a Dutch oven type covered pot in fewer hours.
5. Now it’s a Tuesday morning, and you’ll need something for dinner. Defrost one of the meals you prepared on the weekend. In the evening when you’re ready to cook it, place it into a serving dish in a toaster oven rather than a microwave. Toaster ovens have several advantages over microwaves. At about $40 they are much cheaper, smaller, and quieter. However, those benefits are far outweighed by the health advantage: microwave rays are unhealthy radiation, and when you microwave in a plastic container, it drives the phthalates of the plastic right into your food, which gives an otherwise excellent meal a toxic twist that you definitely do not need.
Microwave radiation also leaks throughout the whole kitchen from most
microwave ovens, which creates an unhealthy atmosphere for adults, children and
pets. For re-heating in your toaster oven, you’ll need one or two Pyrex-type
serving dishes, about a liter each. Heating leftovers for two or three people in a
toaster oven takes 10 to 15 minutes, not very much longer than a microwave.
6. Also use your toaster oven for breakfast. Take out some of the freezer vegetables you prepared, and sprinkle some cheese, raw is preferable, over top, and heat it up for a healthy whole food breakfast, or break an egg over the vegetables. Neither of these will spike your insulin levels, unlike so many other dishes that we unfortunately have become accustomed to thinking of as breakfast foods.
7. Use your toaster oven to prepare hot, healthy lunches for yourself and your family. Invest in a good-sized thermos with either glass or stainless steel (not aluminum) interior for each family member. While eating breakfast, heat up leftovers from last night, or a separately defrosted meal in your serving dish in the toaster oven, again for 10 to 15 minutes. Spoon it into each thermos. Then in each lunchbox, add a fork and little containers of nuts or some fresh fruit or some celery, cherry tomatoes, cucumber or carrot sticks.
You all will then have lunches that will be wonderfully nutritious, well balanced, and appetizing for every adult and child in your family. When all lunches are prepared together assembly-line style, the process will go faster than if each lunch is made separately. And your savings will begin to be obvious as your restaurant and fast food expenses plummet toward zero.
8. Take advantage of savings on seasonal produce. Get organic whenever possible. It has been by steadily rising consumer demand that growers have begun to get more and more organic produce into your local stores.
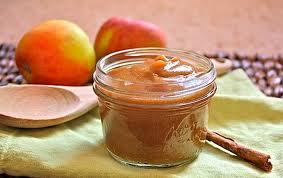
Here is a way to extend the seasonal savings. Fruit preserves can be made unsweetened, and rely only on the natural sweetness of the fruit. Buy a case of about four pounds of berries when in season. Also buy three Granny Smith apples for pectin, which is a natural jelling agent. Peel and core the apples. Cut into about 1/2-inch cubes. Place the apple pieces in a large pot, with about three pounds of washed and stemmed (if necessary) berries. (Keep the other one pound fresh for snacking.)
Simmer the berries and apples on low for about an hour while you are preparing your week’s worth of meals. At the end of an hour, you should have a thin fruit spread. Take a potato masher and mash any remaining chunks of apple and berries as desired. Let it cool. The texture will get a little thicker. Freeze it in pint-size containers. This makes a nice fruit spread that will keep indefinitely. You may be surprised that the berry flavor is plenty sweet enough without added sweetener. You can spread this with a nut butter on slices of apple or pear for breakfast or snacks.
9. Don’t forget condiments. How often have you bought a bunch of parsley or cilantro with the good intention of using all of it, only to find most of it forgotten and wilted two weeks later, shoved behind other foods?
When it’s still fresh, chop it up finely and store in Ziploc-type bags in the freezer. Then you can access it as needed for the one teaspoonful you may want, without having it wilt away before you get a chance to use it. But if you really want fresh herbs, grow them. My favorite Greek salad dressing calls for mint, oregano and parsley, which fortunately are all easy to grow, so I make sure I always have at least one plant of each growing, and I harvest sprigs each time I make the dressing. The fragrance alone of the just-picked herbs are what make the salad.
10. For the crockpot, food processor, thermoses and toaster oven recommended above you may spend about $130. In order to recoup that investment, do yourself a huge favor and change your mindset about potable liquids. There is really no good reason to drink anything other than water (R.O filtered or spring water). In fact, when we drink other liquids, we train ourselves to slake our thirst with different tastes than water, which then makes the taste of water seem strange. Since our bodies are 90 percent water, the only thing strange about this is our acquired perception of water as strange.
Leave the heavy and expensive juices, teas, lattes and liquor at the store. Water is the only substance that can quench both the thirst we feel and the dehydration that almost everyone experiences to one degree or another. Drink it as you like it, with ice or without, with lemon or without, but reacquaint yourself with the one beverage that hydrates and moisturizes all the way in to the cellular level and out to the skin: water.

6. Also use your toaster oven for breakfast. Take out some of the freezer vegetables you prepared, and sprinkle some cheese, raw is preferable, over top, and heat it up for a healthy whole food breakfast, or break an egg over the vegetables. Neither of these will spike your insulin levels, unlike so many other dishes that we unfortunately have become accustomed to thinking of as breakfast foods.
7. Use your toaster oven to prepare hot, healthy lunches for yourself and your family. Invest in a good-sized thermos with either glass or stainless steel (not aluminum) interior for each family member. While eating breakfast, heat up leftovers from last night, or a separately defrosted meal in your serving dish in the toaster oven, again for 10 to 15 minutes. Spoon it into each thermos. Then in each lunchbox, add a fork and little containers of nuts or some fresh fruit or some celery, cherry tomatoes, cucumber or carrot sticks.
You all will then have lunches that will be wonderfully nutritious, well balanced, and appetizing for every adult and child in your family. When all lunches are prepared together assembly-line style, the process will go faster than if each lunch is made separately. And your savings will begin to be obvious as your restaurant and fast food expenses plummet toward zero.
8. Take advantage of savings on seasonal produce. Get organic whenever possible. It has been by steadily rising consumer demand that growers have begun to get more and more organic produce into your local stores.
Here is a way to extend the seasonal savings. Fruit preserves can be made unsweetened, and rely only on the natural sweetness of the fruit. Buy a case of about four pounds of berries when in season. Also buy three Granny Smith apples for pectin, which is a natural jelling agent. Peel and core the apples. Cut into about 1/2-inch cubes. Place the apple pieces in a large pot, with about three pounds of washed and stemmed (if necessary) berries. (Keep the other one pound fresh for snacking.)
Simmer the berries and apples on low for about an hour while you are preparing your week’s worth of meals. At the end of an hour, you should have a thin fruit spread. Take a potato masher and mash any remaining chunks of apple and berries as desired. Let it cool. The texture will get a little thicker. Freeze it in pint-size containers. This makes a nice fruit spread that will keep indefinitely. You may be surprised that the berry flavor is plenty sweet enough without added sweetener. You can spread this with a nut butter on slices of apple or pear for breakfast or snacks.
9. Don’t forget condiments. How often have you bought a bunch of parsley or cilantro with the good intention of using all of it, only to find most of it forgotten and wilted two weeks later, shoved behind other foods?
When it’s still fresh, chop it up finely and store in Ziploc-type bags in the freezer. Then you can access it as needed for the one teaspoonful you may want, without having it wilt away before you get a chance to use it. But if you really want fresh herbs, grow them. My favorite Greek salad dressing calls for mint, oregano and parsley, which fortunately are all easy to grow, so I make sure I always have at least one plant of each growing, and I harvest sprigs each time I make the dressing. The fragrance alone of the just-picked herbs are what make the salad.
10. For the crockpot, food processor, thermoses and toaster oven recommended above you may spend about $130. In order to recoup that investment, do yourself a huge favor and change your mindset about potable liquids. There is really no good reason to drink anything other than water (R.O filtered or spring water). In fact, when we drink other liquids, we train ourselves to slake our thirst with different tastes than water, which then makes the taste of water seem strange. Since our bodies are 90 percent water, the only thing strange about this is our acquired perception of water as strange.
Leave the heavy and expensive juices, teas, lattes and liquor at the store. Water is the only substance that can quench both the thirst we feel and the dehydration that almost everyone experiences to one degree or another. Drink it as you like it, with ice or without, with lemon or without, but reacquaint yourself with the one beverage that hydrates and moisturizes all the way in to the cellular level and out to the skin: water.
When it comes to meal preparation, many people feel that their own lifestyle and difficult
or hectic life circumstances keep them from attempting to cook. What is so beneficial
about preparing your own whole, healthy food using some of the above steps is that any
able-bodied adult can do it.
Cooking big but freezing small is the best way for a single person to enjoy fully balanced home-cooked meals. For a busy parent with children of various ages, the kids can be recruited to help, and in turn receive the nutrients they most desperately need.
Even toddlers can peel carrots, while older children can wash and chop foods. Some of our warmest childhood memories are from ordinary days and activities together with family members in the kitchen. Bestow the goodness on them too; pass the tradition to the next generation so that cooking does not become just another lost art.
Do any of you have any time and cost saving ideas to share??


